Tuesday, July 1, 2014

Phase 2 - Fruits, Veggies + Protein

PHASE 2 COULD NOT COME SOON ENOUGH!

I was so excited to start combining flavors for Ardea and to introduce proteins to her diet. You can start introducing some spices (spices, not spiciness) to the purees, herbs like basil and mint -- so much closer to grown up food! And a little easier to prepare with the dinner you make for yourself.

Some things to keep in mind:

- Babies at this phase don't need a lot of meat or fish -- 2-3 tspns. is sufficient
- If you are going to introduce egg yolk at 7 months, offer half of it at first. I mashed it with a little bit of formula so it wouldn't be so thick (egg whites aren't safe yet because they can be allergenic)
- You can introduce very small amounts of oil and dairy if you choose -- I started using Laughing Cow cheese and occasionally adding olive oil to Ardea's purees
- No bumpy fruits yet unless they're cooked

At this point, I use a bunch of small tupperware with individual vegetables or fruits, then I mix and match them with proteins. Sometimes, if Ardea really likes a combination, I'll combine them in advance and freeze the combination.

For breakfast, I usually give Ardea a fruit puree with oatmeal and half an egg yolk if she seems really hungry. For lunch, I try to give her some combination of veggies and grains with yogurt. Dinnertime is when I feed her animal proteins or tofu.

I will keep adding to these lists as I discover more combinations! I welcome suggestions!

Fruits

I loved introducing Ardea to these phase 2 fruit combinations -- mostly because I loved the way they tasted (I snuck more than my share of bites while I fed them to her). For breakfast, I mix some baby oatmeal with the puree. For lunch and dinner, I mix them with yogurt or I let her eat them on their own. These purees are also tasty for older kids and adults when mixed into yogurt or ice cream!'

Under my supervision, I also let Ardea gnaw on a chunk of banana (that I hold) or such on an orange slice.

- 1 mango + 2 peeled peaches
- Blueberries + peaches (I boiled the blueberries and peaches in water that just barely covered them before pureeing the mixture, due to the tough skins)
- Avocado + banana (Ardea's favorite)
- Blueberries + Asian pear + apple (I peeled and chopped the pear and apple, then I boiled the mixture before pureeing it)
- Pineapples + lychees (fresh lychees, not canned)


Veggies + Grains
I thin out these purees with veggie or chicken stock.

- Green beans + veggie stock + potatoes + spinach + 1 piece of thinly sliced basil + 1/2 tspn. olive oil
- Cooked carrots + fresh orange juice + cumin + quinoa (I cook the quinoa in broth)
- Roasted broccoli + Laughing Cow cheese (I toss the broccoli in a little bit of olive oil and roast it in a 400 degree oven)


Proteins

- Soba noodles + salmon + green beans + veggie stock (this would also be good with avocado)
- Ground beef + potato + cauliflower (I cook the ingredients in a pot with just enough water to cover the ingredients)


Phase 2 - Chicken porridge

Ardea had her first cold recently -- it was really one of the more emotional experiences I've had since she's been born, second only to her being in the hospital for two weeks when she was born. That sad little cough! Her little piglet snorts!  I was so glad I had some of this porridge to give her as a kind of chicken soup for babies. In Vietnam, porridge is also one of a baby's first foods so I was also excited to start introducing Ardea to part of my heritage.

Chicken Porridge
1 4lb chicken (you can go smaller too)
1/2 small cabbage, quartered
1 small onion, halved
3 carrots, peeled and cut into 1 inch chunks
8 oz mushrooms
Water
1/3 cup uncooked rice

Place the chicken and vegetables in a pot and fill with water about 2 inches above the vegetables. Cook for about 1 hour. Pierce the chicken to make sure it is done and no red liquid comes out.

Take the chicken out of the pot. Shred one of the chicken breasts into very very small pieces and set aside. (If you want ideas for what to do with the rest of the chicken, check out my previous post here).

Keep about half of the cabbage and carrots, and a quarter of the mushrooms and onion. Add the uncooked rice. Bring this mix to a boil, then simmer for about 20 minutes -- check the rice grains to make sure they're soft. Remove the vegetables and rice and put them into a food processor. Add the chicken and about 1/2 cup of the stock. Start the food processor -- keep an eye out on the consistency and chunkiness of the puree. If it is too thick, add more stock.

You can freeze leftover stock in an ice cube tray and use it to thin out other baby purees.


Sunday, June 29, 2014

Summer Side Dish: Sweet Chili Quinoa Salad

A light, tasty accompaniment for all those yummy grilled summer proteins! Feel free to add avocado for creaminess, or some cucumbers or shaved radish for more crunch.

Sweet Chili Quinoa Salad
(serves 2)

1/2 cup uncooked quinoa
1 cup chicken or veggie broth
1 small zucchini, sliced thin (I use a vegetable peeler)
1/2 - 1/4 cup cherry tomatoes, halved
1/2 lime
Handful of chopped cilantro
1 tbspn sweet Thai chili sauce (start out with this much, then increase the amount gradually to taste -- a little goes a long way)

Rinse and drain the quinoa. Place the quinoa with the broth in a pot and bring to a boil. Cover, lower the heat and simmer for 15 minutes.

Place the zucchini, tomatoes, and lime juice at the bottom of a serving bowl. Add the cooked quinoa and toss -- the warm quinoa will gently cook the zucchini. Add the chili sauce and cilantro. Enjoy!

Introducing Ardea to Solids -- Basic Thoughts and Phase 1 Foods


Babies have 3 times more taste buds than adults.


After finding this tidbit out, I was even more excited about Ardea trying solids. I was so curious -- would she like savory foods or just want sweets all the time? Would she be a picky eater or eat anything put in front of her? Would she like Vietnamese food?

I was so patient. Since she was born two months premature, I did not want to rush her into eating solids if her digestive system was not ready. Then finally....she started to be more interested in what I was eating. She started putting toys in her mouth. She started sitting with little support. YES! It was time!

At first I tried baby cereal mixed with formula. Ardea was not into it. I tried multiple times, she would look at me like "What the...." and not swallow. So I backed off, thinking maybe I was misreading the signs and she wasn't actually ready. But one day I decided to mix in kale puree into the cereal -- it worked! She was opening her mouth in anticipation of the next spoonful. She almost finished half the bowl I made for her. Yes!

So now I had to make some decisions -- am I going to make her food or am I going to buy it? What kind of produce would I use? How would I come up with stuff to make? How could I introduce her to different flavors?

* Before going any further, I stress that I am merely sharing my thoughts and what worked for me -- everyone is different. I am sharing, not proselytizing.

What is my goal in shaping her introduction to solids?
Eventually, I want to be able to take whatever we're eating and pulse it a few times in the food processor so I can cook once for everyone. Then later on hopefully she'll be used to and will actually like what my husband and I are eating.

To make or not to make?
Ardea eats the food I make her most of the time. However, there are stretches where I haven't gone to the grocery store to get fresh produce or it is more convenient to bring along pre-made baby food rather than fresh food that can go bad while we're out. I treat packaged baby food the way I treat take out for my husband and me -- once in a while is fine, but it's not something I like to do all the time.

* I will say, it is a good idea to keep frozen veggies and fruit in the fridge for those days when you realize you've run out of baby food and you don't have any fresh ingredients.

Why make baby food?
The short answer is because I can. It is really easy when you are introducing babies to one vegetable, one flavor at a time, to steam or boil a vegetable and puree it. Since they're not eating very much in the beginning, one batch can last days. The power of mommy guilt was really present here -- if it is so quick and easy to do it, then why not do it? Aside from iron enriched cereal and oatmeal, there is no doubt that giving Ardea fresh fruits and vegetables was better for her than buying the jarred counterpart.  Why not allow my daughter to eat fruits and vegetables when they taste their best? If she is tasting peaches for the first time, why introduce her to the best version of it? It's also easy for me to throw some things together in a pot to make stock and let it go while I'm playing with her.

I also like how making food for her encourages my husband and me to eat better. Always having fresh fruits, vegetables and good quality proteins on hand gives us no choice but to eat at home.

Where would I get inspiration? What kind of ingredients should I use?
One of my favorite resources for what to make Ardea is the Northside Farmer's Market, a weekly farmer's market in my neighborhood. We walk to it every week (weather permitting) and I can get something local, organic, and in season (aka at its best) for her to try. That's where we got asparagus, where we got swiss chard, kohlrabi... It is really fun and takes some of the pressure off of me to think about what to have her try next.

I have to admit, I also peep the baby foods aisle and look at the combinations that baby food companies come up with. I look at the ingredients and use the combinations as inspiration. Sweet potatoes and apples? Great idea -- I'll look out for those in the produce aisle. Coconut milk, lentils and pumpkin? Got it.

Tools, Ingredients, and Storage
Before Ardea, I occasionally bought organic produce. It felt like such a big expense and I only purchased organic fruits and vegetables that were part of the "dirty dozen" for pesticide residue. Now, I purchase organic produce to make Ardea's food. The idea of any pesticide residue getting into her system at this early point in her life is not worth me saving 50 cents, especially when I'm buying small quantities.

I use a blender and a food processor. I hear an immersion blender works well too.

When you are just starting out, an ice cube tray is a good inexpensive way to portion food you make. Babies aren't eating very much at the beginning anyway so you can freeze it, then pop out the cubes into a ziplock bag. I also like this Beaba Multiportions Freezer Trays. It was on my baby registry and I love it -- the food is really easy to pop out and it comes with a cover. I fill each slot with about 2 tablespoons of baby food then microwave it for about 35 seconds when it's time to eat. These containers are also really great. You can freeze individual flavors, then thaw a few at a time and mix and match the flavors during stage 2.

I've been making food for almost 2 months now and I have never had anything in the freezer for more than a week, but I would use the frozen baby food within 1-3 months.

The Meal Plan
At the recommendation of my doctor, I started Ardea out with green vegetables. She ate kale for about 3 days, then I would introduce another green vegetable to her.  By introducing one vegetable at a time, you can pinpoint any food that causes an allergic reaction. For example, if your child has eaten broccoli and been fine, but later when you mix broccoli with rice he/she has an allergic reaction, you can deduce that he/she has a rice allergy. This also delays her introduction to sweet foods.

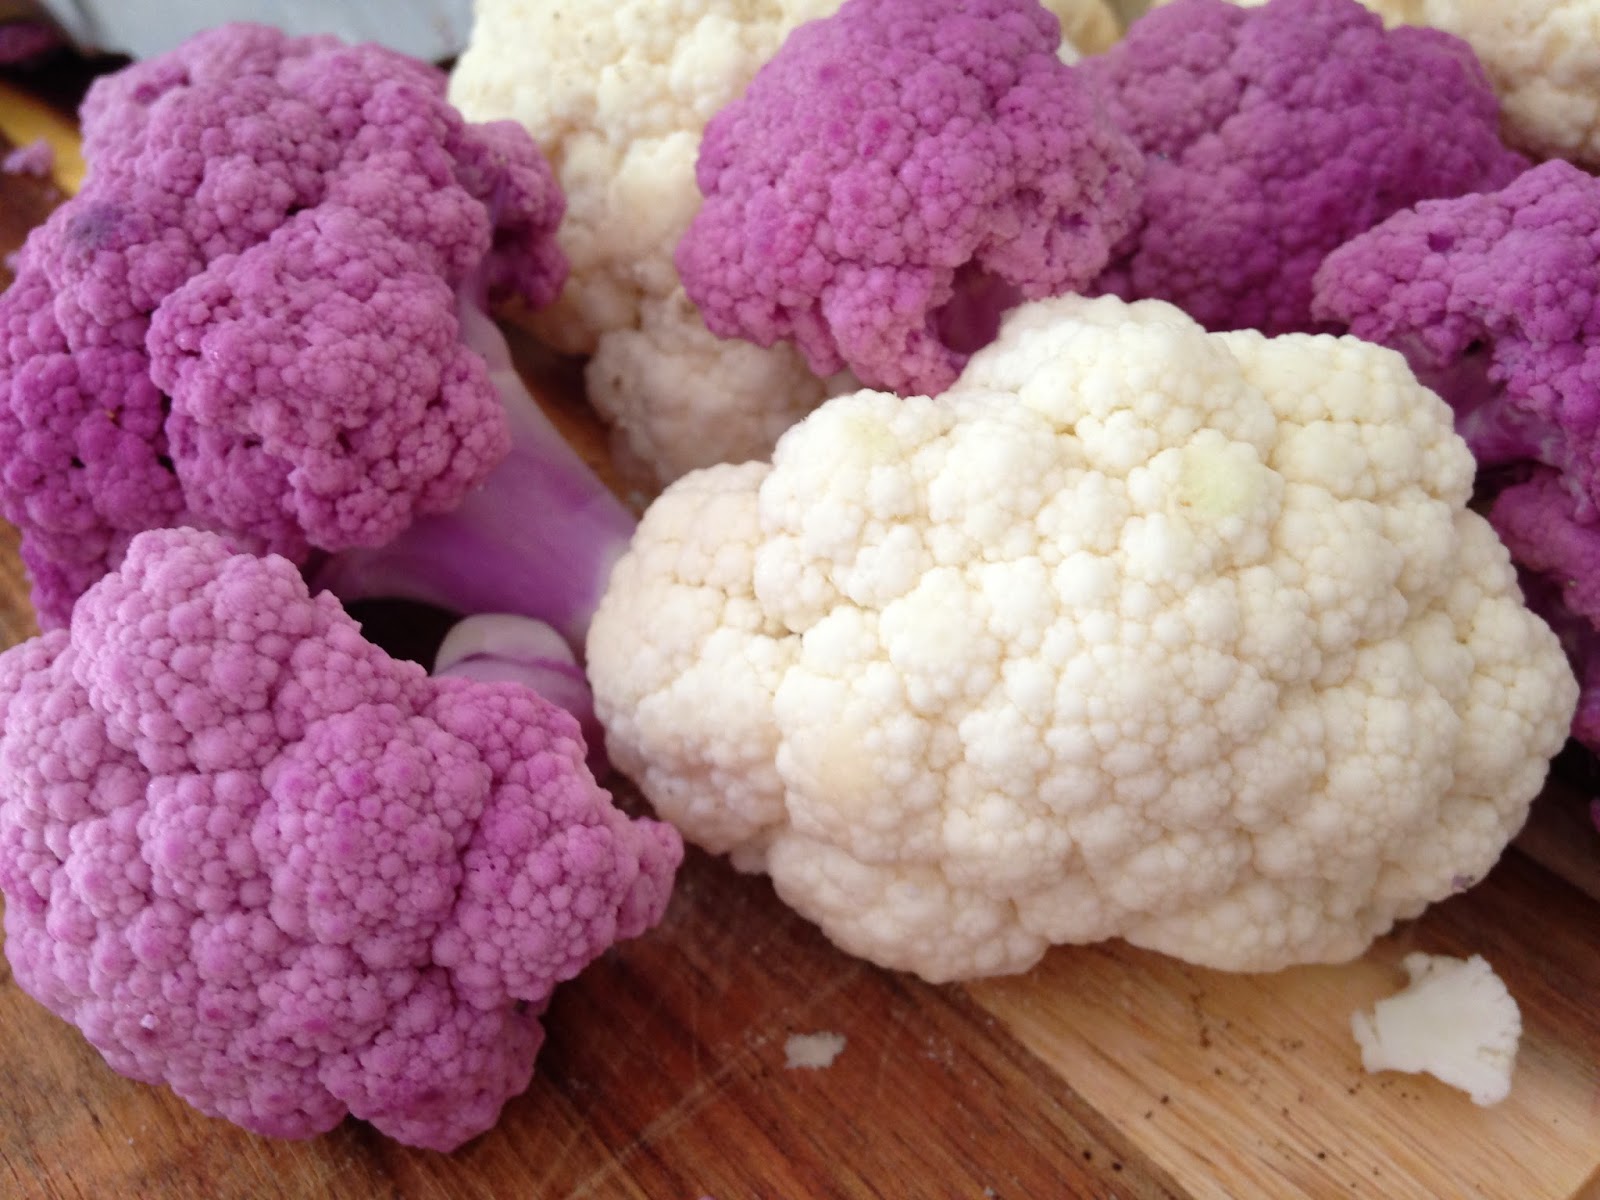
After about 2 weeks of this, I moved on to other strong tasting vegetables like cauliflower. After that phase, I moved on to orange vegetables. It was very hard for me to be patient -- I just wanted her to try everything! And I wanted to mix everything together! But I did my best. After all the veggies, I moved on to fruits.

Also, I taste everything I make for her. I expect it to be a little bland, but if it takes like water, I know I've thinned it out too much and she's not getting to really taste the vegetable or fruit I'm introducing to her.

I don't know if this method really shaped the way she approached food, but I will say that she LOVES the vegetables that many adults don't even like. She loves cauliflower, kale, cabbage, broccoli. She may have liked these vegetables regardless of how I introduced them to her, but I thought I'd share my process nonetheless. Ok, now time to get cooking!

Phase 1 Foods

During this phase, I boiled or steamed these vegetables until I could pierce them easily with a fork. When they were cooked, I processed them and thinned it out (if necessary) with the water that the vegetable or fruit was cooked in until the puree was completely smooth. I only thinned out the puree for smoothness -- I did not want the mix to become watery. Here are some suggestions for things to introduce your baby to during the introductory phase of solids:


  • Kale
  • Asparagus
  • Cauliflower
  • Broccoflower
  • Broccoli
  • Peas
  • Spinach
  • Swiss chard
  • Carrots
  • Any kind of squash 
  • Radish (I credit my brother for this one -- it tastes like cauliflower!)
  • Avocado
  • Banana
  • Mango
  • Peaches
  • Papaya
  • Apple
  • Asian pear


Thursday, March 13, 2014

Tasty reads!

1) This Tree of 40 Fruits is incredible:
http://www.foodandwine.com/blogs/2014/3/4/the-single-most-beautiful-innovation-at-tedxmanhattan?xid=DISH030714TheSingleMostBeautiful

2) A great little blurb about emerging food scenes in the U.S. -- including Cincinnati!: http://www.usatoday.com/story/experience/food-and-wine/best-of-food-and-wine/2014/03/11/small-cities-big-food-scenes/6187081/

3) Buffalo chicken mac n cheese? Yes, please: http://www.seriouseats.com/recipes/2014/03/essential-stovetop-macaroni-and-cheese-with-variations-from-kitchen-confidence.html

4) Can't wait to check this out -- love the growing popularity of grains: http://www.thekitchn.com/amazing-grains-by-ghillie-james-new-cookbook-201040

5) The smoked butter caramels come a close second to this Confiture Cafe au Lait from Crafstman and Wolves in San Francisco (but really I want to eat everything on this site): http://www.craftsman-wolves.com/shop/confiture-cafe-au-lait

Sunday, September 22, 2013

Cauliflower "Pizza"

When I started dating my husband six years ago, I remember his father would visit New York for business and we would go to such fancy, delicious restaurants. It wasn't just a desire for good food that drove us to these places, my future father-in-law was on a very strict diet, similar to that of individuals who have Celiacs disease. More upscale restaurants were accommodating and also had delicious varieties of the protein + veggie entrees that he was limited to. The two biggest limitations were gluten and processed sugar, then a number of other foods like corn and melon and potatoes. As an Asian person who likes to cook, the first time I wanted to prepare a meal for him I thought...what the $%#! can I make?! He can't eat fish sauce! No noodles! No rice! 

Being so close to someone with these eating limitations actually became a really fun challenge for me, and opened me to a different relationship with food. I couldn't rely on a starch or prepared condiments to build flavor or mental food satisfaction -- I had to rely on building flavor naturally. What a great door to be forced to walk through! Since then his diet his become way less limited -- I remember how relieved I felt when we discovered potatoes and rice products didn't make him sick anymore before our wedding. However, the lessons in cooking I learned are still there and I still get excited to try new gluten free variations of familiar foods. Like this cauliflower "pizza" crust! 

This is not as crunchy and bready as a real pizza crust, so any expectation of that needs to be eliminated before trying this. BUT, it is still delicious and worth trying even if you are not gluten intolerant. No yeast, yummy cauliflower, and it still had the notes of pizza flavor you crave. If you are gluten intolerant and have missed pizza, this is awesome.

Tips before giving this a go -- squeezing out the water out of the cauliflower is very very important and makes the difference between a crispy crust versus a floppy one. Also, let the crust stay in the oven just a tad longer than you think it should be in there -- let that cheese get brown and crisp up.

To top the pizza, I just pureed a can of San Marzano tomatoes, seasoned with salt and pepper. I like my pizza sauce tangy, less on the sweet side. Enjoy!

Cauliflower "Pizza" Crust
Florets from 1 medium sized head of cauliflower (about 3 cups once processed), washed + dried
1/4 tspn kosher salt 
1/2 tspn dried oregano
1/2 tspn dried parsley 
1/2 tspn garlic powder
1/4 cup shredded parmesan cheese
1/4 cup mozzarella cheese
1 egg + 1 egg white, beaten
2 tblspns almond meal

Special equipment: pizza stone (or baking sheet)

Place a pizza stone (or baking sheet) in the oven. Preheat oven to 450 degrees. Prepare a piece of parchment paper and spray it with nonstick cooking oil. 

Pulse the florets in a food processor for about 30 seconds, until it's crumbly and looks like cous cous. Microwave the cauliflower for about 4 minutes. Let the cauliflower cool for a bit (otherwise this next part will hurt your hands!). Wrap the cooked cauliflower in a dish towel and squuuuuuuueeeeze until you feel you've gotten as much water as you can out of the cooked cauliflower.


Place the cauliflower in a bowl and add the cheeses, salt, dried herbs, garlic powder, almond meal, and eggs. Combine the ingredients with your hands and form it into a ball.

Place the ball on the parchment paper and start pressing it + patting it into a round pizza-like shape. Don't press it too thin, and try not to have gaps around the edge of your pizza.

Slide the parchment paper onto the hot pizza stone. Bake for about 11 minutes, until it starts to turn golden brown. Cool the crust by delicately placing the parchment sheet on a cookie rack.

Add your pizza sauce and toppings (this one has spinach, freshly grated mozzarella and turkey pepperoni) then place the pizza with the parchment paper back in the oven for another 5-7 minutes until the cheese is melted and nice and brown.

Let the pizza cool for a few minutes on the cookie rack before serving.

Wednesday, September 4, 2013

The Piglette making little piglets

I was in a mode where I was super motivated to update this blog regularly and devote a good portion of my summer to making fresh, light, beautiful meals. I was going to be super hostess and have fun tapas parties and grill outs galore....until I found out I was pregnant in May. Then I became tired. And lazy. And a huge fan of things like donuts and Skyline and basically anything that I didn't have to prepare myself. I get bursts now and then -- and it manifests itself on my Instagram page -- but not so much here. Because mostly I've been eating things like this:
However, I have been trying to balance out my meals so that I'm not a complete glutton destined for gestational diabetes. Anything crunchy and watery has been right up my alley -- watermelon, grapes, pickles. I have also become obsessed with green tomatoes. The squirrels in our neighborhood get to the red tomatoes before we do, so initially using green tomatoes arose out of necessity. I didn't have any red tomatoes on hand and I wanted to throw them in a salad. The green tomatoes were just staring at me outside so I thought why not? Now I actually prefer them to red tomatoes in a lot of things because you always know that they'll be firm -- you'll never get caught off guard but a mushy, grainy green tomato. It's wonderful! I mixed in some green tomatoes for a panzanella-like salad


I made a green tomato salad with pickled pistachio relish (recipe here: http://www.foodandwine.com/recipes/green-tomatoes-with-pistachio-relish)

I threw green tomatoes into a calamari salad with thinly sliced celery, onions and a lemon parsley vinaigrette, I've been dreaming about how they'd taste juiced -- there are so many possibilities! Since summer is not officially over yet, it's a great time to make use of these green beauties rather than waiting around until they ripen to turn them into sauce (although that is also a very worthy, delicious use).

On a personal level, I read this blog post by Emily Henderson tonight about her sixth months of pregnancy: http://stylebyemilyhenderson.com/blog/6-month-pregnancy-update/. I am five months along and I related to so much of her post. I am also incredibly in love with my husband right now, and I feel so grateful that he is the father of my child and that he will be my parenting partner. I have been riding the hormone rollercoaster for sure... One morning Tyler and I were walking to a bakery for donuts and we ran into a really kind, sweet neighbor who had the audacity to want to stop and talk to us. At the time, I felt like I'd never been more furious or impatient in my life. Why was she interrupting my donut run?! And there was that day I cried because Tyler wouldn't go to Target with me... I do however love being pregnant. Even on the days when I wasn't feeling well -- it boggles my mind that there is a thing growing inside me which eventually will became a full sized human. It is insane and I can't believe this is how people are made. I love not caring about sucking in my stomach. I love how my maternal instincts are in hyperdrive right now and I just want to love and mother everyone (when my hormones aren't telling me otherwise). I love imagining Tyler as a father. It's just such a happy time and I don't care (right now) about becoming a big ol' whale. It is incredible that I get to experience this and I am so happy. We are also in the process of buying a house -- we're under contract and we're hoping to get most of the work done that needs to be done before January rolls around. I can't wait for this baby room! I am more excited about that one room than I am about that whole house.

So even though I'm not devoting as much time cooking and learning about food as I hoped I would at the beginning of the summer, I am very very excited about what's taken over that part of my brain and stomach instead. Maybe being pregnant will inspire me to combine things in a way worthy of posting so I can remember it even when I'm not driven by 3 am ramen cravings...

Monday, June 10, 2013

Adventures in Hungarian Cooking....

I am so excited to post this recipe. As I mentioned in my last post, my friend Eszter and I are swapping cooking lessons, teaching each other how to make dishes from our respective cultures. This weekend she taught me the secrets of her incredibly savory and delicious beef stew. Oh my goodness, I can't describe how happy this stew makes me. You know that delicious onion taste that coats your tongue when you eat a French onion soup? That rounded taste that you just want to savor for a moment before you take your next spoonful? That's how this soup tastes. Serve it with some spaetzle like pasta, a side of crunchy, tangy cucumber salad and check off another country on your culinary repertoire.

Hungarian Beef Stew

1-2 onions, diced
3 tbspns. canola oil
2 tbspns. Hungarian paprika
About 3 lbs. stew beef, cut into cubes
Flour
2 tbspns. seasoned salt (Eszter tells me Vegeta and Maggi are her preferred brands)
1 jug of cheap wine, like Carlo Rossi Burgundy
Noodles/pasta (recipe follows, or you can use this)

Sautee the diced onion in the canola oil in a nice big soup pot until translucent. Add the paprika, stir. Add the stew meat and cook until lightly browned. Sift enough flour into the pot to lightly coat all the beef and stir. Add the red wine to the pot, enough to cover the beef and onion mixture, and the seasoned salt. Cook on high heat in a crockpot until the meat is tender, at least 3 hours and up to 6 hours. If you don't have a crockpot, you can prepare this stew in an ovenproof pot and heat it covered in a 350 degree oven for 4 hours.

Serve with fresh pasta and enjoy!


Pasta
2 eggs
1 cup of water
Salt
All purpose flour

Heat a large pot of salted water to boil. Whisk the eggs, a pinch of salt and water together. Start adding flour to the eggs-water until you get a wet shaggy mix, stirring the mixture with a wooden spoon. Add more water if you've added too much flour, add more flour if you have too much water. Once you've reached this consistency, start stirring pretty vigorously until you get a smooth, more doughlike mixture.

Once the pot of water boils, place a colander with large holes or a Spaetzle maker (like this) over the boiling water. Start pressing batches of the dough through the holes into the water, removing the pasta from the water once the bits float to the surface. You can toss the cooked pasta with some oil to keep it from sticking.


Cucumber Salad  (optional but tasty)
(for 2 servings)

1 long English cucumber
Salt
2 tbspns. white distilled vinegar
3 tbspns. sugar
1 clove of garlic, minced (you can add more to taste)
Sour cream
Hungarian sweet paprika

Thinly slice the cucumber using a mandoline and place into a bowl. Sprinkle 2 generous pinches of salt over the cucumbers and let sit for about 5-10 minutes. Pour out the water that is released after this time (Eszter doesn't). Add the minced garlic, sugar and vinegar. Toss the cucumbers in this mixture. Top the cucumber mixture with a generous amount of sour cream (like a 1/4 cup) and sprinkle some paprika on top. Cover and refrigerate until time to eat.

Saturday, June 1, 2013

Weekend (Culinary) Projects

I have been in transition for the past two months (three?). My husband and I sold our house and are currently living with his parents while we look for a new house. Packing up my kitchen was pretty bittersweet -- over the next few months I'll be missing my bowls, my glasses, my familiar utensils... All those things that don't truly matter in the big picture but are noticeably missing when you love to cook as much as I do.

But enough whining. Between the move and my friend Tara moving and my anniversary and birthdays and living in a new neighborhood with more restaurants to check out, there has been way too many opportunities/excuses to eat out. It's been a slow start but now I am getting back to tinkering in the kitchen again (and hopefully updating this blog more regularly!).

My current neighbor has been a good friend for the past few years. She is a lovely Hungarian-born woman who moved here from London. I used to babysit her children and one very wonderful benefit of doing that was being able to taste her delicious Hungarian cooking. Now that we're neighbors, we are starting a cooking swap. Last week she came over and I taught her how to make a few variations on summer rolls. Today I went over to her house nice and early to start learning how to prepare her Hungarian beef stew. She told me that in Hungary, she would still eat a variation of this stew but it would be cooking in a nice big pot over a fire pit outside, accompanied with some crusty bread. That is such a lovely image and I can't wait to taste the results tonight! If I manage to recreate this magic I will definitely share.


I am also starting to get excited about my weekend breakfasts again and I decided to prep a loaf of cranberry + orange zest + pecan bread for tomorrow morning using my favorite easy recipe (click through for the recipe).


I also made some treats to include in another dear friend's birthday present. Frannie is a wonderful, super creative, fun chef (and friend) and I am very lucky to be the recipient of her treats from time to time. For Christmas, she gave me a Sazerac in a mason jar, local honey, sparklers, and cookies which included chocolate chips, pretzels and potato chips. For my birthday, she gave me homemade smoked salt and homemade bourbon vanilla extract. She's amazing. For her birthday, I wanted to flex my creative culinary muscle and push myself to explore gourmet homemade gifts. It's been really fun!

Frannie loves chocolate. This spread, although pretty thick, is delicious on toast! You can of course add more coconut oil and more honey to taste, but these are good starting measurements. Heating up the almond butter will also help with spreadability.


Chocolate Almond Pecan Butter
(makes 1 small tasty mason jar)

1 cup almonds
1/4 cup pecans
1 1/2 tbspn. honey (I used some Gorman Heritage Farm honey for any Cincinnatians reading this)
1/4 cup coconut oil
2 tbspns. chocolate chips
1/2 tbspn. good quality cocoa powder
Sea salt

Finely grind the almonds and pecans in a food processor. Add the coconut oil, sea salt and 1 tbspn. honey and process until the mixture becomes nice and smooth (this may take a while, be patient). Add more coconut oil depending on your desired consistency, but be careful not to make the spread too liquidy.

Once you reach your desired consistency, add the cocoa powder, chocolate chips and 1/2 tbspn. of honey. Process further until all the ingredients are well blended.

For Frannie's present, I am also including a jar of infused vodka which I think will be perfect for making bloody marys. There are plenty of resources and ideas on the web -- I was inspired by the Fine Cooking website: http://www.finecooking.com/item/27069/spicy-infusions-make-better-bloody-marys


Spicy Bloody Mary Vodka

1 bottle vodka (good, but not too good)
1 tbpn. chili flakes
2 stalks of celery, quartered with leaves

Let this mixture steep for at least 24 hours, then after that to taste. Once the vodka has reached your preferred level of spiciness/celeryness, strain all the solids out and keep the vodka in the freezer until you use it.

Hope everyone else is having as tasty a weekend as I'm having!

Monday, April 8, 2013

The road to eating organic

It is difficult sometimes to make the choice to buy organic produce. The difference in price on a quart of strawberries means nothing in a singular purchase, but a whole basket full of organic produce purchased on a weekly basis adds up. A while ago I remember watching an episode of Ellie Krieger's cooking show on the Food Network where she suggested buying some organic produce rather than all organic. As a guideline, she suggested buying organic whenever you were going to eat the peel or outside of the fruit or vegetable. For example - strawberries? Organic. Cantaloupe? Non organic. I have incorporated that idea into my shopping ever since. Now when I shop, I incorporate organic and locally grown items with other items I buy for economy. 

I came across this list in the September 2012 issue of Whole Living which I think is handy for anyone else who would like to try this shopping philosophy. It is a list of produce, ranked from bad to worst in terms of residual pesticide levels when produced using conventional farming methods. You can also download an app from the Environmental Working Group website (http://www.ewg.org/foodnews/guide/) to use as a shopper's guide to pesticides in produce. 

1) Potatoes
2) Blueberries (domestic)
3) Cucumbers
4) Lettuce
5) Spinach
6) Grapes
7) Nectarines (imported)
8) Strawberries
9) Peaches
10) Red peppers
11) Celery
12) Apples